Daily blog
Friday 3/27
Today was my last day. I finished up a few loose ends on the suspension setup chart in the morning, then helped my mentor assemble a customizable weld fixture he designed. The weld fixture will allow them to create a bike with any custom geometry numbers, sizing, or suspension design and will expedite the prototype frame welding because of this. In the afternoon, I was taught how to lace up a wheel to a hub using the three cross method, and then how to true the wheel to account for wobble, hop, gap, and tension.
Today was my last day. I finished up a few loose ends on the suspension setup chart in the morning, then helped my mentor assemble a customizable weld fixture he designed. The weld fixture will allow them to create a bike with any custom geometry numbers, sizing, or suspension design and will expedite the prototype frame welding because of this. In the afternoon, I was taught how to lace up a wheel to a hub using the three cross method, and then how to true the wheel to account for wobble, hop, gap, and tension.
Thursday 3/26
Today I worked on wiring up a light fixture to the fan assembly. It took a lot of trial and error to make both the fan and light to turn on, and it wasn't exactly the cleanest solution as the switch box turned into quite the jumble of multi colored wires. However, later in the day, a customer stopped in for a tour of the factory. He happened to be an electrician, and when he saw the jumble I had created he offered to fix it up real quick. He then basically rerouted all the wires so they wouldn't get tangled and simplified the birds nest of wires in the switch box, and got the outlets on the switch box working. In the afternoon, I switched two negative spring assemblies in forks. The negative spring is a spring that helps the fork compress easier in the first few inches of travel, and I was swapping a stiff one for a softer one, which improves the overall feel of the fork. This involved dropping the lowers off of the stanctions, draining the oil, unscrewing the negative springs, swapping them, and then putting the lowers back onto the fork and refilling it with oil.
Today I worked on wiring up a light fixture to the fan assembly. It took a lot of trial and error to make both the fan and light to turn on, and it wasn't exactly the cleanest solution as the switch box turned into quite the jumble of multi colored wires. However, later in the day, a customer stopped in for a tour of the factory. He happened to be an electrician, and when he saw the jumble I had created he offered to fix it up real quick. He then basically rerouted all the wires so they wouldn't get tangled and simplified the birds nest of wires in the switch box, and got the outlets on the switch box working. In the afternoon, I switched two negative spring assemblies in forks. The negative spring is a spring that helps the fork compress easier in the first few inches of travel, and I was swapping a stiff one for a softer one, which improves the overall feel of the fork. This involved dropping the lowers off of the stanctions, draining the oil, unscrewing the negative springs, swapping them, and then putting the lowers back onto the fork and refilling it with oil.
Wednesday 3/25
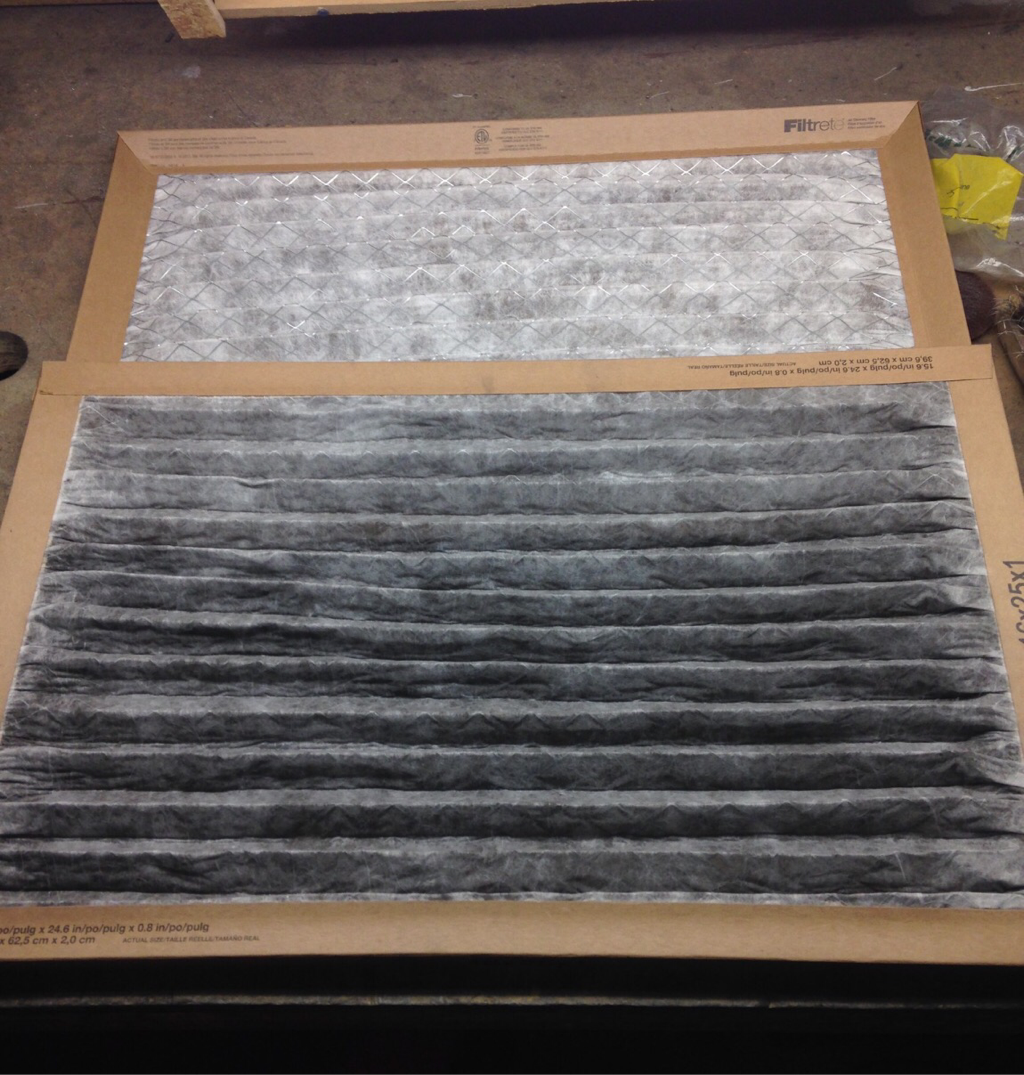
Today I finished up some details on the geometry chart and took sag readings for another shock for the suspension setup guide. Additionally, I checked up on the filter to see how much dust it had filtered out. Below is a photo comparing a filter with about 5 days of use to a brand new filter.
Today I finished up some details on the geometry chart and took sag readings for another shock for the suspension setup guide. Additionally, I checked up on the filter to see how much dust it had filtered out. Below is a photo comparing a filter with about 5 days of use to a brand new filter.
Tuesday 3/24
Some people had told Matt and Will that they had trouble finding all of the geometry for the bikes on the GG website, so today I compiled all that information into one place and then created a simple diagram for their web designer to reference, with all the relevant geometry numbers labeled. Hopefully, this will make it easier for prospective customers to find the geometry of the bikes, and will help them understand what terms like reach and bottom bracket height actually mean. Additionally, I did small jobs around the shop like sweeping and washing bikes.
Some people had told Matt and Will that they had trouble finding all of the geometry for the bikes on the GG website, so today I compiled all that information into one place and then created a simple diagram for their web designer to reference, with all the relevant geometry numbers labeled. Hopefully, this will make it easier for prospective customers to find the geometry of the bikes, and will help them understand what terms like reach and bottom bracket height actually mean. Additionally, I did small jobs around the shop like sweeping and washing bikes.
Monday 3/23
I worked on creating the suspension posters for Winter Park today. It was pretty uneventful, except I had to change the background of a picture of one of their bikes from white to black for the poster, and the fill tool wouldn't completely change the background to black so I spent a decent chunk of an hour filling in white spots on this photo file using photo editing software. Additionally, I read a bit about suspension design from a book about designing race cars and talked to Matt about how the principles in the book related to mountain bikes, and how some things like chain growth are byproduct of the design, not goals of the design, and don't effect how the suspension performs as much as other variables, such as pivot placement do.
I worked on creating the suspension posters for Winter Park today. It was pretty uneventful, except I had to change the background of a picture of one of their bikes from white to black for the poster, and the fill tool wouldn't completely change the background to black so I spent a decent chunk of an hour filling in white spots on this photo file using photo editing software. Additionally, I read a bit about suspension design from a book about designing race cars and talked to Matt about how the principles in the book related to mountain bikes, and how some things like chain growth are byproduct of the design, not goals of the design, and don't effect how the suspension performs as much as other variables, such as pivot placement do.
Friday 3/20
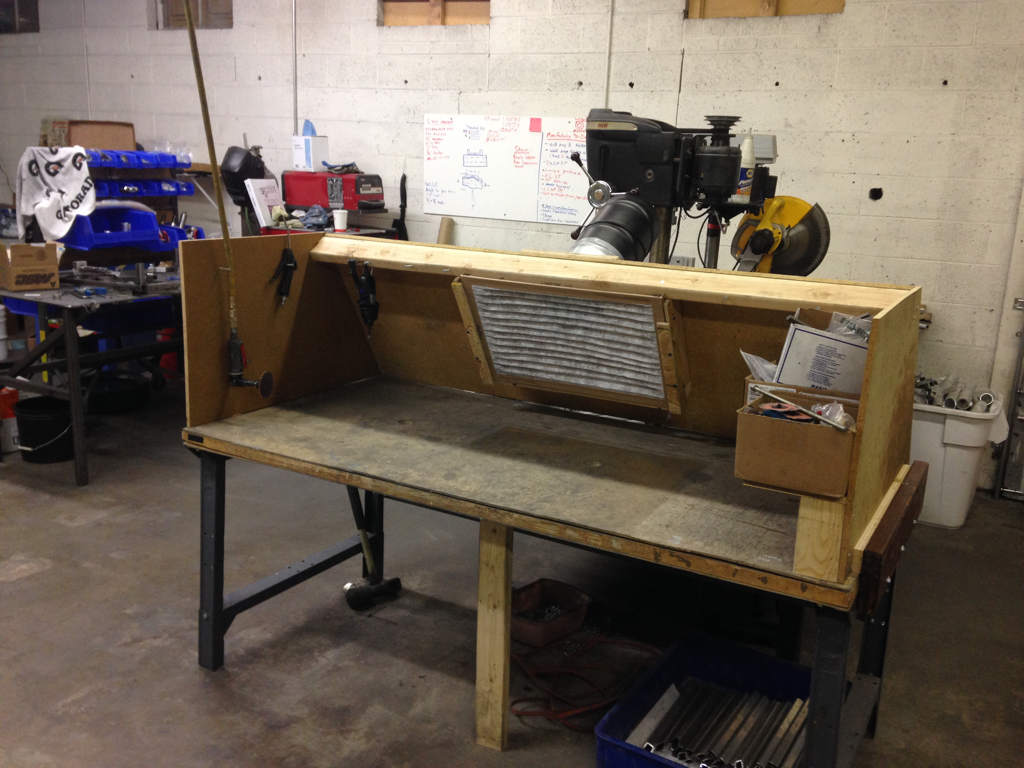
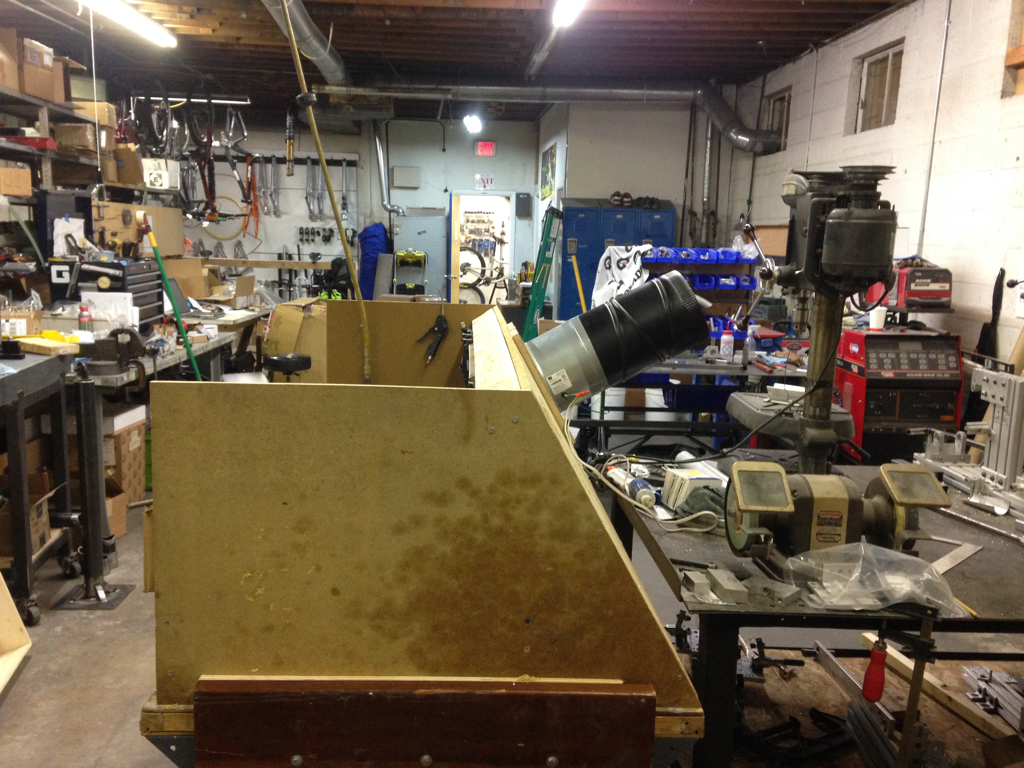
Today I finished my filtration project. I made an adapter for the ten inch hole and the 8 inch fan, then spent a fair bit of time searching for wire nuts to connect the fan to the power source. After I made sure the fan was wired correctly and blowing air in the right direction, I added a few small details like a shelf and screws for hanging tools on. See below for photos of my project. In the afternoon, I helped in the service area mounting tires on to rims, and began working on the suspension poster for Winter Park using sag data I collected.
Front view:
Side view:
Thursday 3/19
Today I assembled the frame of the ventilation system. I started out by making a few cuts in the wood I was using and then assembling it all together using screws. At about noon Matt went off to run a few errands and while he was out he picked up the fan, filters, and a few other bit and pieces that I needed. Unfortunately, no stores in Denver had a ten inch duct fan in stock so Matt bought an eight inch fan instead. Unfortunately, I had already made a ten inch diameter cut in the frame, so the fan doesn't fit. Tomorrow I will make some sort of adapter for the fan to fit, wire it up, and make any refinements as needed.
Today I assembled the frame of the ventilation system. I started out by making a few cuts in the wood I was using and then assembling it all together using screws. At about noon Matt went off to run a few errands and while he was out he picked up the fan, filters, and a few other bit and pieces that I needed. Unfortunately, no stores in Denver had a ten inch duct fan in stock so Matt bought an eight inch fan instead. Unfortunately, I had already made a ten inch diameter cut in the frame, so the fan doesn't fit. Tomorrow I will make some sort of adapter for the fan to fit, wire it up, and make any refinements as needed.
Wednesday 3/18
After going over my design with Matt I made a few revisions and finalized some concrete details about the dimensions of my project, such as backboard tilt and fan size. In the afternoon, I started cutting up all the pieces for the wooden frame, which was pretty slow going because I couldn't make any bad cuts due to limited wood supply. I finished probably 3/4 of the cuts I have to make, so after I finish those tomorrow morning, I'll be able to start assembling the final project.
After going over my design with Matt I made a few revisions and finalized some concrete details about the dimensions of my project, such as backboard tilt and fan size. In the afternoon, I started cutting up all the pieces for the wooden frame, which was pretty slow going because I couldn't make any bad cuts due to limited wood supply. I finished probably 3/4 of the cuts I have to make, so after I finish those tomorrow morning, I'll be able to start assembling the final project.
Tuesday 3/17
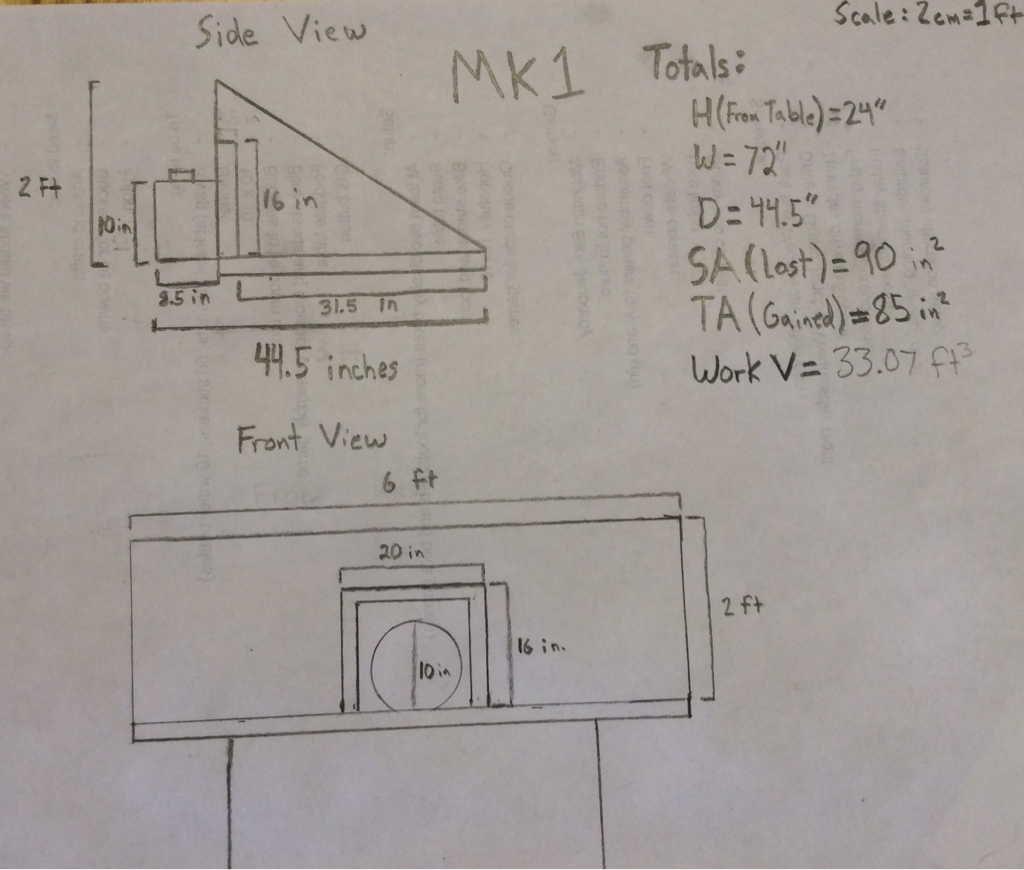
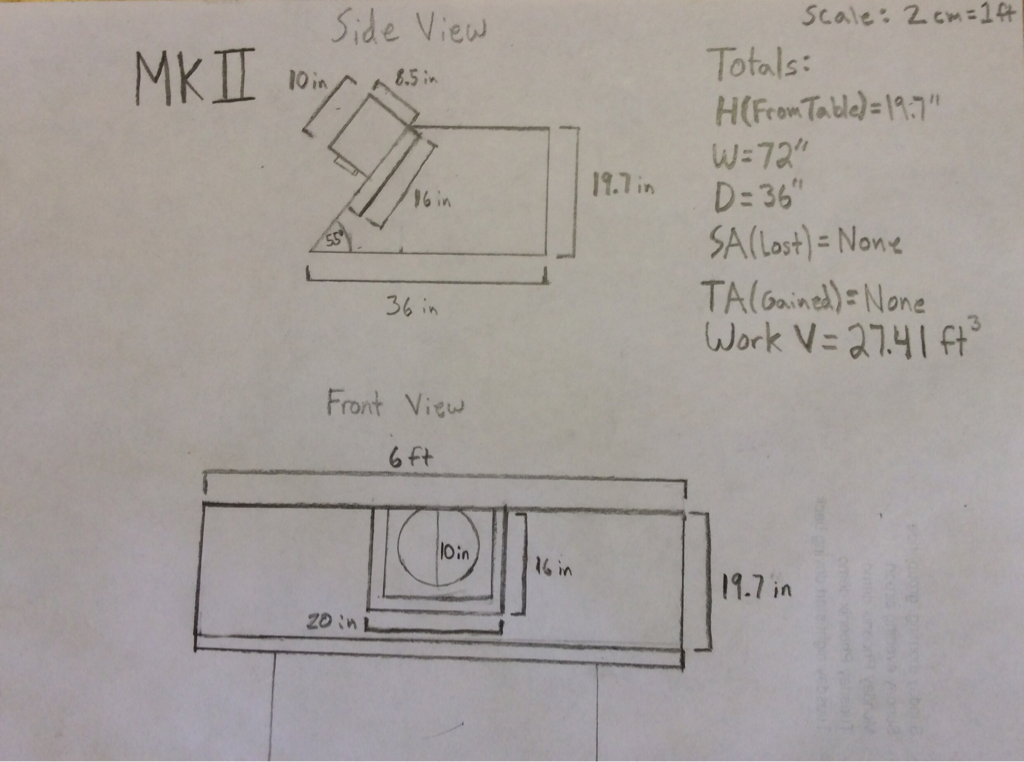
Today I finalized the PowerPoint I mentioned yesterday, adding slides about potential issues with my design, subsystem requirements, design constraints, and rational for my design. Additionally, I made rough sketches of my MK1 and MK2 designs to include in the presentation. In my MK2 design, I am trying to balance correct airflow, small footprint, and adequate space for the user to clean frames.
MK1:
MK2
Monday 3/16
I worked more on the filtration project today. I ran some ideas about the frame and fan placement by Matt and he gave me some feedback based on future use and placement of the frame cleaning table. I then sketched up a model of the frame and began a project design PowerPoint overviewing the objective of the project, costs, and the pros and cons of a few different ideas I have.
I worked more on the filtration project today. I ran some ideas about the frame and fan placement by Matt and he gave me some feedback based on future use and placement of the frame cleaning table. I then sketched up a model of the frame and began a project design PowerPoint overviewing the objective of the project, costs, and the pros and cons of a few different ideas I have.
Friday 3/13
Today, I worked on a another little mini project Matt gave me. Guerrilla Gravity recently sold a few demo bikes to the Winter Park Bike Park and to ensure that the demo riders are riding a correct suspension setup I am making a poster with a few fork and shock setup guidelines based on weight. As rider weight increases, the spring rate and damping forces inside the fork and shock must also increase to compensate for the extra forces put on the bike, and too much or too little dampening inside the suspension will create a bike that rides too harshly or too soft. The chart that I'm making has the baseline suspension settings in 20 pound increments for anyone in between 120-220 pounds, to ensure that the rider will have the best possible demo experience. I also worked on the requirements and specifications for the filtration project and conducted more research about fans and the CFM needed for this application.
Today, I worked on a another little mini project Matt gave me. Guerrilla Gravity recently sold a few demo bikes to the Winter Park Bike Park and to ensure that the demo riders are riding a correct suspension setup I am making a poster with a few fork and shock setup guidelines based on weight. As rider weight increases, the spring rate and damping forces inside the fork and shock must also increase to compensate for the extra forces put on the bike, and too much or too little dampening inside the suspension will create a bike that rides too harshly or too soft. The chart that I'm making has the baseline suspension settings in 20 pound increments for anyone in between 120-220 pounds, to ensure that the rider will have the best possible demo experience. I also worked on the requirements and specifications for the filtration project and conducted more research about fans and the CFM needed for this application.
Thursday 3/12
Today was my first day at Guerrilla Gravity. I started out by getting a tour of the building, starting in the showroom and then going back into the workshop where all the aluminum tubes are bent, cut, aligned, and welded into bicycles. After the tour, my mentor, Matt, gave me an overview of my project, which is to create a system that filters aluminum dust out of the air during the frame polishing process that happens post heat treatment. I spent the rest of the day observing Shawn, the frame cleaner, work to help gain a better understanding of the needs of the system, talking about bikes and the design process with Matt, and researching commercial air filters.
Today was my first day at Guerrilla Gravity. I started out by getting a tour of the building, starting in the showroom and then going back into the workshop where all the aluminum tubes are bent, cut, aligned, and welded into bicycles. After the tour, my mentor, Matt, gave me an overview of my project, which is to create a system that filters aluminum dust out of the air during the frame polishing process that happens post heat treatment. I spent the rest of the day observing Shawn, the frame cleaner, work to help gain a better understanding of the needs of the system, talking about bikes and the design process with Matt, and researching commercial air filters.
